For all that we know about roofs–which is a great deal–sometimes things can get confusing. I am more than partly to blame for that. I wrote a lot of the code language dealing with both vented and unvented roof assemblies. Yes, the language is confusing.2
I am going to focus on unvented roofs and hybrid roofs. Not on vented roofs in the strict use of the term vented roof.3 The hope is to un-confuse a few things.
As a practical matter you can insulate on the top of a roof deck, on the bottom of a roof deck–and wait for it – on both the top and bottom of a roof deck. Clear? How you do it is the trick. The physics may be logical, but the code language may not be. Having said that, the code does allow all three approaches. Trust me…it does.
So what is the most robust approach? Easy answer. The first method developed historically. Add all the insulation on the top of the roof deck. Just take good standard commercial compact roof design and slope it (Figure 1). Note that in commercial compact roofs that work–an air barrier is necessary. This air barrier thing is a big deal with white roofs since they no longer get hot enough to drive moisture back downward into the conditioned space. So you have to keep the air from getting up into them from the underside.4 It is also a big deal for uplift (“BSI-019: Uplifting Moments—Roof Failures”).

Figure 1: Good Standard Commercial Compact Roof—Just slope it. An air barrier is necessary. This air barrier thing is a big deal with white roofs since they no longer get hot enough to drive moisture back downward into the conditioned space. So you have to keep the air from getting up into them from the underside. It is also a big deal for uplift.
Adapting a good standard commercial compact roof design gives you Figure 2. Simple, elegant, robust. So what can go wrong? A whole bunch of things. First of all you really, really, really need an air barrier on your roof deck. In Figure 2 with traditional board sheathing the air barrier should be a fully adhered membrane. Sheet polyethylene does not work as it rips, tears, punctures easily and otherwise sucks as an air barrier. If you use sheet goods such as plywood or OSB as your roof deck you have two options. First, go with a fully adhered membrane as you would with traditional board sheathing. Second, select a sheet good system that allows you to tape the joints of the sheets to create the air barrier. Taped OSB works if you use the right tape with the right OSB (“BSI-067: Stuck on You”).
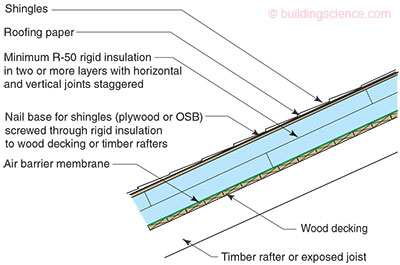
Figure 2: Robust Unvented Roof—With traditional board sheathing the air barrier should be a fully adhered membrane. If you use sheet goods such as plywood or OSB as your roof deck you have two options. First, go with a fully adhered membrane as you would with traditional board sheathing. Second, select a sheet good system that allows you to tape the joints of the sheets to create the air barrier. Taped OSB works if you use the right tape with the right OSB.
What else do you need to know about? Well, if you are in a high snow load zone you have deal with ice dams and the best way to do that is to construct a vented “over-roof” over the top of the unvented “under-roof” (Figure 3). See “BSI-046: Dam Ice Dam”. The new twist to these roofs is more roofing membrane options. The roofing membrane on the topside of the unvented “under-roof” has traditionally been a vapor permeable roofing felt but now with new materials available it can be a fully adhered “vapor permeable” membrane. Yes, you read that right…there are vapor permeable fully adhered membranes available. Alternatively, you can go with a taped OSB sheathing system that is semi vapor permeable.
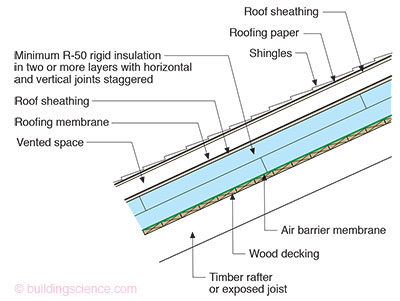
Figure 3: Control Ice Damming—Construct a vented “over-roof” over the top of the unvented “under-roof”. The new twist to these roofs is more roofing membrane options. The roofing membrane on the topside of the unvented “under-roof” has traditionally been a vapor permeable roofing felt but now with new materials available it can be a fully adhered “vapor permeable” membrane. Yes, you read that right…there are vapor permeable fully adhered membranes available. Alternatively, you can go with a taped OSB sheathing system that is semi vapor permeable.
Are we done yet with the “adding all the insulation to the top of the roof deck” approach? Nope. The layers of insulation are “thick” and they affect the aesthetics of the roof edges. We dealt with this before when we looked at retrofit over-roofing (“BSI-063: Over-roofing—Don’t Do Stupid Things”). Figure 4 illustrates how you could extend the overhang to “hide” the thickness of the insulation–if the thickness thing irritates you.
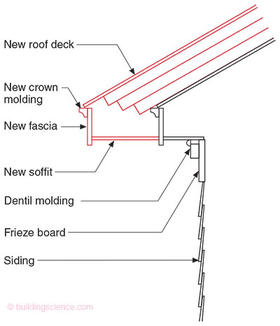
Figure 4: Thick Roof—The layers of insulation affect the aesthetics of the roof edges. You can extend the overhang to “hide” the thickness of the insulation–if the thickness thing irritates you.
Anything else? Yes. Amazingly enough you have to attach the upper layer of roof sheathing (plywood or OSB) through 8 to 10 inches of rigid insulation. You need long screws. How many and how far apart? The good news is that this is less complicated than installing continuous insulation on walls. Huh? Yes. Less gravity better friction. Uplift is the problem not slippage and bending moment of the fasteners. The folks who do commercial flat roofs have this uplift thing dialed in. The same fastening requirements for uplift for flat roofs will work for these roofs while simultaneously handling the slippage issue. Except where it snows a lot. Snow likes to stick to sloping roofs. With lots of snow things get very complicated. The good news is that structural engineers have a good handle on this–especially ones who work in ski resorts–particularly Swiss and Austrian engineers. They have no sense of humor but they know their stuff. You absolutely have to have an adult involved in this type of an assembly in a high snow load zone.
What about using panels such as SIP or “nail base”? It is all about the joints. We have been here already. See “BSI-036: Complex Three Dimensional Airflow Networks”. The message is always have an air barrier membrane over your roof deck under a “nail base” panel system. Always have a vented over-roof over a SIP assembly in a cold climate even if you are not in an ice-dam zone. There are some folks who are attaching a “nail base” panel directly over rafters omitting a roof deck. Don’t go there. Structurally it makes life difficult. Good luck with getting a roof diaphragm if your structural deck is separated from your roof framing by a layer of insulation.
Let’s now take a run at the “adding all the insulation to the underside of the roof deck” approach. This approach has two variations. The first is the “flow through” approach. The second is the “air impermeable5” approach.
The “flow through” approach is limited to hot dry climates such as Las Vegas and Phoenix. The roof cladding needs to be “back-vented” and the roof sheathing and roofing membrane need to be vapor open. The most typical manifestation of this is a tile roof over batten strips over a roofing felt over plywood or OSB sheathing (Figure 5). Any moisture that accumulates on the underside of the roof sheathing (the “first” condensing surface) is able to pass through (“flow through”) the sheathing and the roofing felt into the air gap under the tile roof and be vented away. New materials allow the roofing felt to be replaced with a vapor permeable fully adhered membrane or a semi vapor permeable taped OSB sheathing6. The most common insulation is netted cellulose (Photograph 1) although spray applied fiberglass, netted fiberglass and fiberglass batts are options.
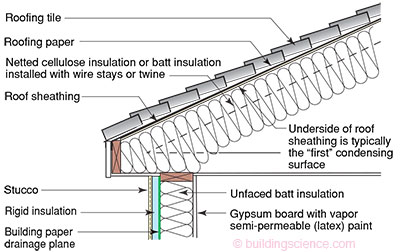
Figure 5: “Flow Through” Roof—This approach is limited to hot dry climates such as Las Vegas and Phoenix. The roof cladding needs to be “back-vented” and the roof sheathing and roofing membrane need to be vapor open. The most typical manifestation of this is a tile roof over batten strips over a roofing felt over plywood or OSB sheathing. Any moisture that accumulates on the underside of the roof sheathing (the “first” condensing surface) is able to pass through (“flow through”) the sheathing and the roofing felt into the air gap under the tile roof and be vented away. New materials allow the roofing felt to be replaced with a vapor permeable fully adhered membrane or a semi vapor permeable taped OSB sheathing.

Photograph 1: Flow-Through Assembly—The most common insulation is netted cellulose although spray applied fiberglass, netted fiberglass and fiberglass batts are options.
The “air impermeable” approach can be used everywhere with two caveats. The first is that in zones where ice damming occurs you still need a vented “over-roof” over the unvented “under-roof”. The second is that in cold climates the vapor transmission of the air impermeable insulation installed on the underside of the roof deck matters. The most common air impermeable insulation used in these applications is spray polyurethane foam (SPF). There are two types: 0.5 lb/ft3 density foam and 2.0 lb/ft3 density foam–often referred to as “open-cell” foam and “closed-cell” foam due to their differences in vapor transmission. Open-cell foam has a vapor transmission of around 30 perms for a 1-inch thickness and closed-cell foam has a vapor transmission of around 2 perms for a 1-inch thickness.
You can use closed-cell in all climate zones. You cannot use open-cell in IECC climate zones 5 or higher unless the foam is used with a Class II (or Class I) vapor retarder. The reason should be fairly obvious. With open-cell foam (Photograph 2) a significant amount of moisture via vapor diffusion will pass upwards through it during cool periods and during the winter in cold climates–too much to be driven back down during sunny weather and during the summer. Additionally, with open-cell foam the attic space it encloses must be conditioned to remove moisture (see “BSI-077: Cool Hand Luke Meets Attics”).
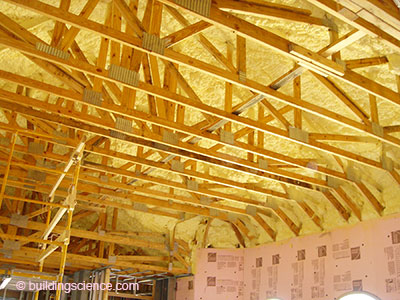
Photograph 2: Open-cell Spray Polyurethane Foam (SPF)—You cannot use open-cell in IECC climate zones 5 or higher unless the foam is used with a Class II (or Class I) vapor retarder. With open-cell foam a significant amount of moisture via vapor diffusion will pass upwards through it during cool periods and during the winter in cold climates–too much to be driven back down during sunny weather and during the summer. Additionally, with open-cell foam the attic space it encloses must be conditioned to remove moisture.
The key to the “air impermeable” approach is that interior air needs to be prevented from accessing the underside of the roof deck. If interior air gets to the roof deck and if the roof deck is cold enough condensation can occur. If enough moisture condenses and accumulates for long enough under the “right” conditions bad stuff can happen like mold, rot and corrosion.
With closed-cell foams you have a couple of interesting issues that you have to address. The application is an exothermic reaction. If you spray the foam on too thickly you will burn the place down. No joke. You can’t spray more than a two-inch layer at a time so that the heat dissipates.
Also the closed-cell foams experience huge shrinkage stresses during the application process. If these stresses are not controlled or restrained correctly things can move in weird ways. That is why “picture-framing” is necessary when spraying rafter cavities or cavity spaces between the top chords of trusses. With “picture-framing” the perimeter of the space is “foamed” first. The stresses, if not controlled, can be great enough to cause the foam itself to split. Or, more dramatically, pop of the roof sheathing or other surface loud enough to wake occupants months later. The forces are large enough to deform roof sheathing – roofs can appear “wavy” if picture framing is not done or not done correctly.
There has been much discussion about open-cell being better under a roof deck than closed-cell because if there is a leak the leak either dries faster or you can see it sooner. Not true. There is no compelling evidence one way or the other. None. I started all this SPF stuff under roof decks in the early 1980’s. I have been looking at this roof leak issue since the very beginning. I have played with mock-ups and wetted them and watched them. I have taken apart existing leaking roofs all over the place, open-cell, closed-cell, SIP’s, compact, etc. With the mock-ups and the field experience I have not noticed any difference between open-cell and closed-cell in terms of detectability and damage with respect to roof leaks. Did I mention the fact that there is no compelling evidence one way or the other regarding roof leaks and open-cell vs. closed-cell?
Ready for this…here it comes…roofs leak. They always have. They always will. Sometime you see the leak, sometimes you don’t. This is true regardless of what system you use. We build big box stores and office buildings and schools and pretty much everything else with multiple layers of insulation and membranes and decking and somehow we manage to deal with roof leaks and it is not the end of the world. Ready for this? Big leaks always leak enough to be noticed. Small leaks don’t always leak enough to be noticed.
Ready for something else? Here it comes….sloping roofs are less of a risk than flat roofs. Wow. This gravity thing is a big deal. With a sloping roof you have less hydrostatic pressure and if you do have a leak it is more likely to be seen inside regardless of roof type.
Back in the day some of us were worried about inward vapor drive through shingles into the roof deck in hot-humid climates. With an unvented assembly underneath there was some concern about the durability of the roof deck. The first code change in 2000 called for a vapor impermeable underlayment to control this inward drive. At the time we had no idea how big the inward drive could be. We looked at it over a couple of years in test structures in hot-humid climates (Photograph 3). It turned out not to be large enough to worry about and so in subsequent code revisions the requirement for a vapor impermeable underlayment was taken out. But some folks never forget. They keep citing it as a code requirement. Stop it already. Inward drive is not an issue.
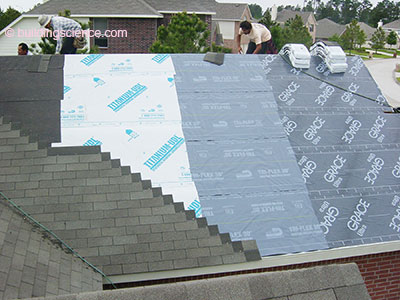
Photograph 3: Test House in Houston, TX—Back in the day some of us were worried about inward vapor drive through shingles into the roof deck in hot-humid climates. With an unvented assembly underneath there was some concern about the durability of the roof deck. At the time we had no idea how big the inward drive could be. We looked at it over a couple of years in test structures in hot-humid climates. It turned out not to be large enough to worry about.
Finally, let’s take a run at the “adding the insulation to both the topside and the underside of the roof deck” approach. The most common way to do this is to use “air permeable” insulation on the underside of the roof deck and rigid insulation on the top of the roof deck. One way to explain this approach is that it is the roofing version of a wall with insulating sheathing on the outside of it. Take a wood frame wall with insulating sheathing and slope it (Figure 6). As in a wall the insulation on the top of the roof sheathing controls the temperature of the condensing surface. The amount of insulation necessary to do this depends on the climate zone and the amount of insulation applied to the underside of the roof deck (Figure 7).

Figure 6: Slope The Wall—The roofing version of a wall with insulating sheathing on the outside of it. Take a wood frame wall with insulating sheathing and slope it.
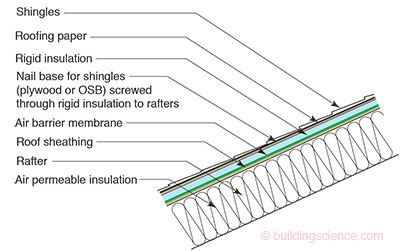
Figure 7: Insulation on Both Topside and Underside—The most common way to do this is to use “air permeable” insulation on the underside of the roof deck and rigid insulation on the top of the roof deck. As in a wall the insulation on the top of the roof sheathing controls the temperature of the condensing surface. The amount of insulation necessary to do this depends on the climate zone and the amount of insulation applied to the underside of the roof deck.
A less common way to do the “adding the insulation to both the topside and the underside of the roof deck” approach is to use air impermeable insulation on the underside of the roof deck rather than air permeable insulation. There is no reason that you can’t use SPF on the underside of the roof deck and rigid insulation on the topside of the roof deck. The neat thing about this approach is that if you use open-cell foam on the underside of the roof deck and rigid insulation on the top side of the roof deck you do not need to have a Class II (or Class I) vapor retarder against the open-cell foam in Climate Zone 5 or higher. Just meet the R-value requirements for the rigid insulation on the top of the roof deck that the code specifies for air permeable insulation.
If you use closed-cell insulation on the underside of the roof deck there is no code requirement as to how much rigid insulation you need to use on the topside of the roof deck. None. Do whatever you want. Knock yourself out. Now, in my opinion, you ought to use at least 2 inches of rigid insulation so that you avoid what happened in Photograph 4–thermal bridging. Guess whose house that was? Yup. It was mine. I am not as smart as I think I am most of the time. I eventually fixed this (see “BSI-063: Over-roofing—Don’t Do Stupid Things”). Of course I used more than 2-inches in my fix. Restraint is not something I am known for.
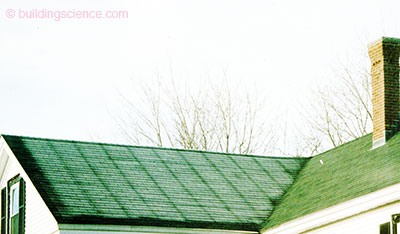
Photograph 4: Thermal Bridging—Guess whose house that was? Yup. It was mine. I am not as smart as I think I am most of the time. At the time this photograph was taken the underside of the roof was insulated with closed-cell spray polyurethane foam (SPF).
Footnotes
- A Latin phrase repeated three times during confession if you are a Catholic and many times during your life if you are an engineer: “mea culpa, mea culpa, mea maxima culpa. The English translation goes “through my fault, through my fault, through my most grievous fault.”
- In my defense writing code language is a political-policy-tradeoff-blackmail-compromise exercise that makes sausage making look good. The current language represents several cycles of code making spanning more than a decade. The physics may be understood, but getting agreement on a code change is a tedious exercise that is not for the faint of heart.
- Constructing a vented “over-roof” over the top of an unvented “under-roof” is common in high snow load areas to control ice-damming (see “BSI-046:Dam Ice Dam”).
- Air barriers have always been a big deal in flat roofs in cold miserable places like Canada even with black roofs. But back in the day you could get away without an air barrier in a flat roof in Washington, DC if the roof was black. Winters were not long enough or cold enough to cause problems and any moisture that did migrate upwards was driven downwards due to the extreme temperatures the black membranes would get to–above 180 degrees F. But with the advent of “greenie weenieism” and the preponderance of white roofs we began to experience roof moisture problems that we would once only see in Canada as far south as Atlanta. The solution was to add an air barrier directly over the top of the roof deck. The greenies got to keep their white roofs and the moisture problems went away.
- Air impermeable is defined as having an air permeance equal to or less than 0.02 l/s-m2 at a 75 Pa pressure differential tested according to ASTM E2178 or E283. The story of where this value came from needs to be told sharing a single-malt. Next time you see me take me up on it. I never get tired of sharing the story…but only over a single-malt.
- There is a possibility that with the recently available fully adhered vapor permeable membranes replacing fully adhered vapor impermeable membranes under tile roofs in places such a Miami and Ft. Myers flow through roof assemblies could be constructed and perform well in hot humid climates not just hot dry climates.
