We have hurricanes, we have floods, we have wildfires….It is hard enough to deal with these as it is…but when we also want high levels of thermal performance…
We are going to look at roofs…not because they are easy or hard…but because they see the greatest stress from wind and rain and wildfire. I am going to focus on wind because if the roof blows away it is kind or dumb to worry about rain. So wind on roofs that have lots of insulation. And we are going to limit the insulation approaches to get a few elegant (“hopefully”) principles across without taking up a lot of space. If you “get it” you can apply it all over the place.
In high wind zones roof assemblies need to be able to resist the wind pressures that can act on them during high wind events such as hurricanes. The issues become more complex with high thermal resistance roof assemblies.
Both low slope roof assemblies and sloped roof assemblies can be constructed from multiple layers (Figure 1 and Figure 2). For low sloped roofs it is common to utilize mechanically attached roof membranes, upper and lower deck sheathing and multiple layers of rigid insulation. For sloped roofs it is typical to utilize asphalt shingles as the primary rain water control layer.
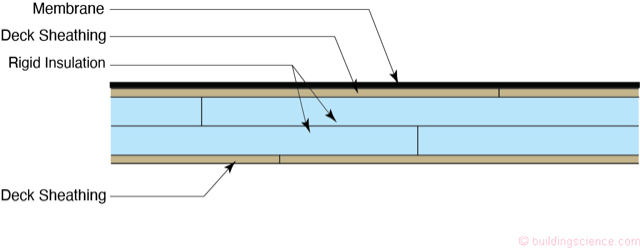
Figure 1: Multiple Layer Low Slope Assembly - For low sloped roofs it is common to utilize mechanically attached roof membranes, upper and lower deck sheathing and multiple layers of rigid insulation. In residential construction the upper and lower deck sheathing is typically plywood or oriented strand board (OSB). In residential construction the rigid insulation is most commonly isocyanurate or extruded polystyrene (XPS).
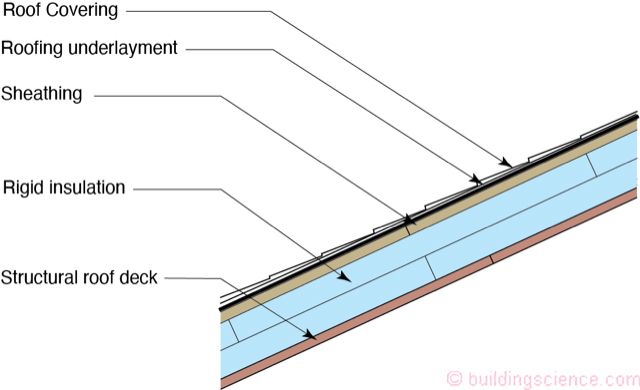
Figure 2: Multiple Layer Sloped Assembly - For sloped roofs it is typical to utilize asphalt shingles as the primary rain water control layer. In residential construction the upper and lower deck sheathing is typically plywood or oriented strand board (OSB). In residential construction the rigid insulation is most commonly isocyanurate or extruded polystyrene (XPS).
In residential construction the upper and lower deck sheathing is typically plywood or oriented strand board (OSB). In residential construction the rigid insulation is most commonly isocyanurate or extruded polystyrene (XPS).
Now for the big blow part. Under high wind events the total wind pressure is resisted by all of the elements of the roof assembly. A series pressure relationship provides a reasonable approximation of what occurs. Note the words “reasonable approximation”….
P(t) = P(m) + P(d) + P(i) + P(i) + P(d)
Where P(t) = total wind pressure
P(m) = membrane pressure
P(d) = deck pressure
P (i) = insulation pressure
P(d) = deck pressure
The tightest element experiences the greatest pressure. In most roof assemblies the tightest element is the roof membrane itself.[1] During high wind events high localized areas of negative pressure (“suction”) occur above roof membranes and roof edges due to the development of vortices (Figure 3 and Figure 4).
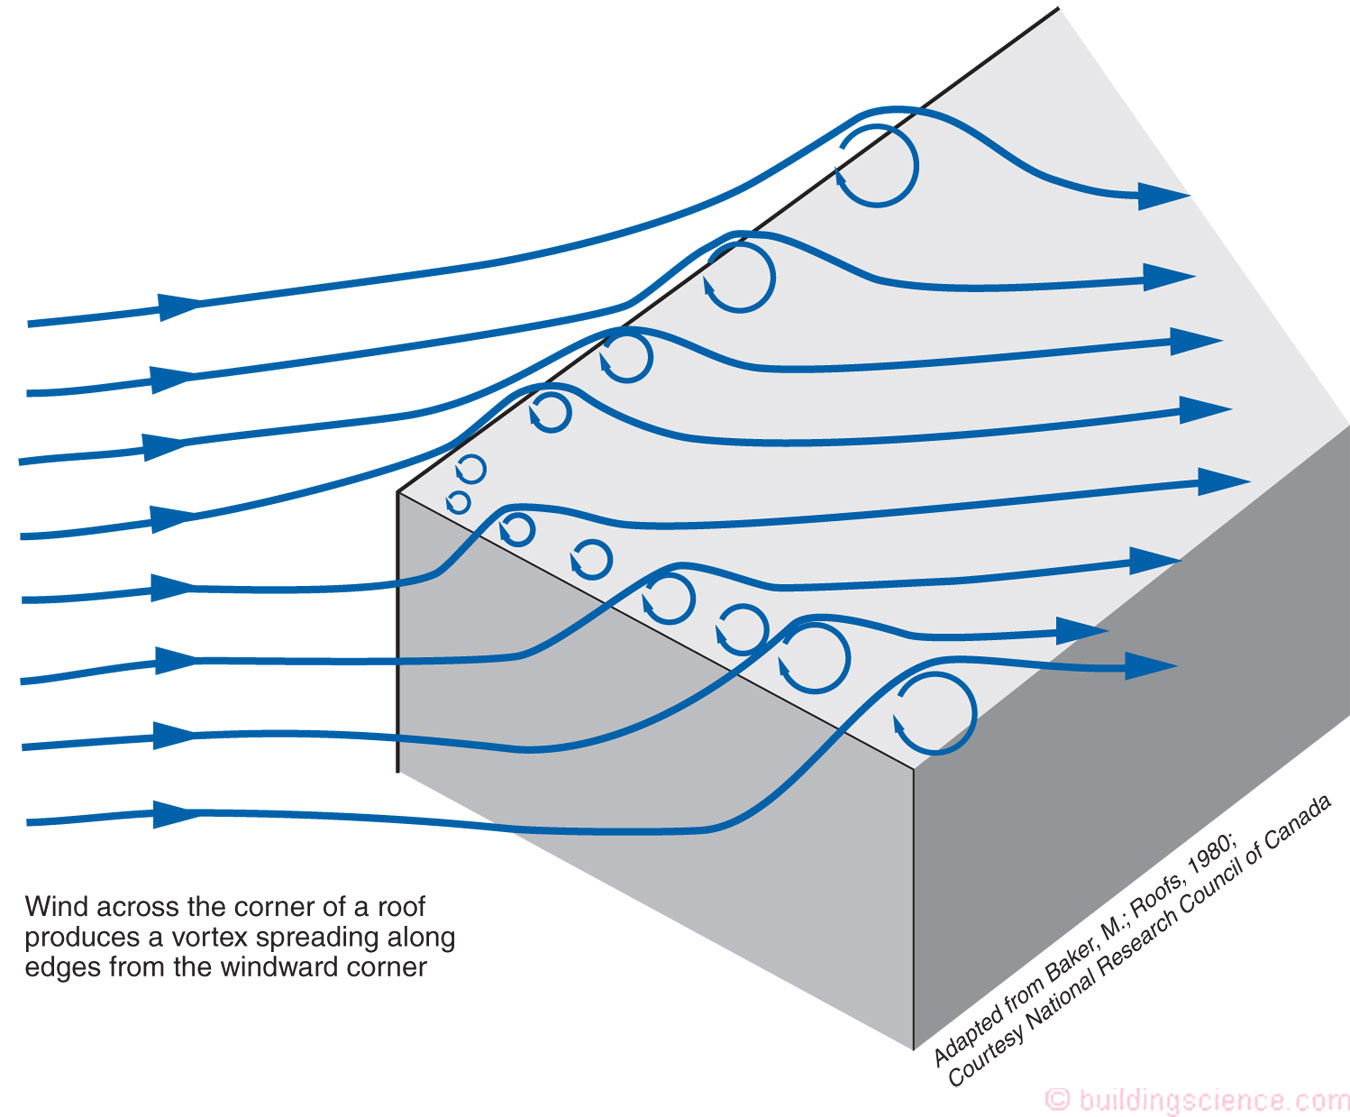
Figure 3: Vortices - During high wind events high localized areas of negative pressure (“suction”) occur above roof membranes and roof edges due to the development of vortices.
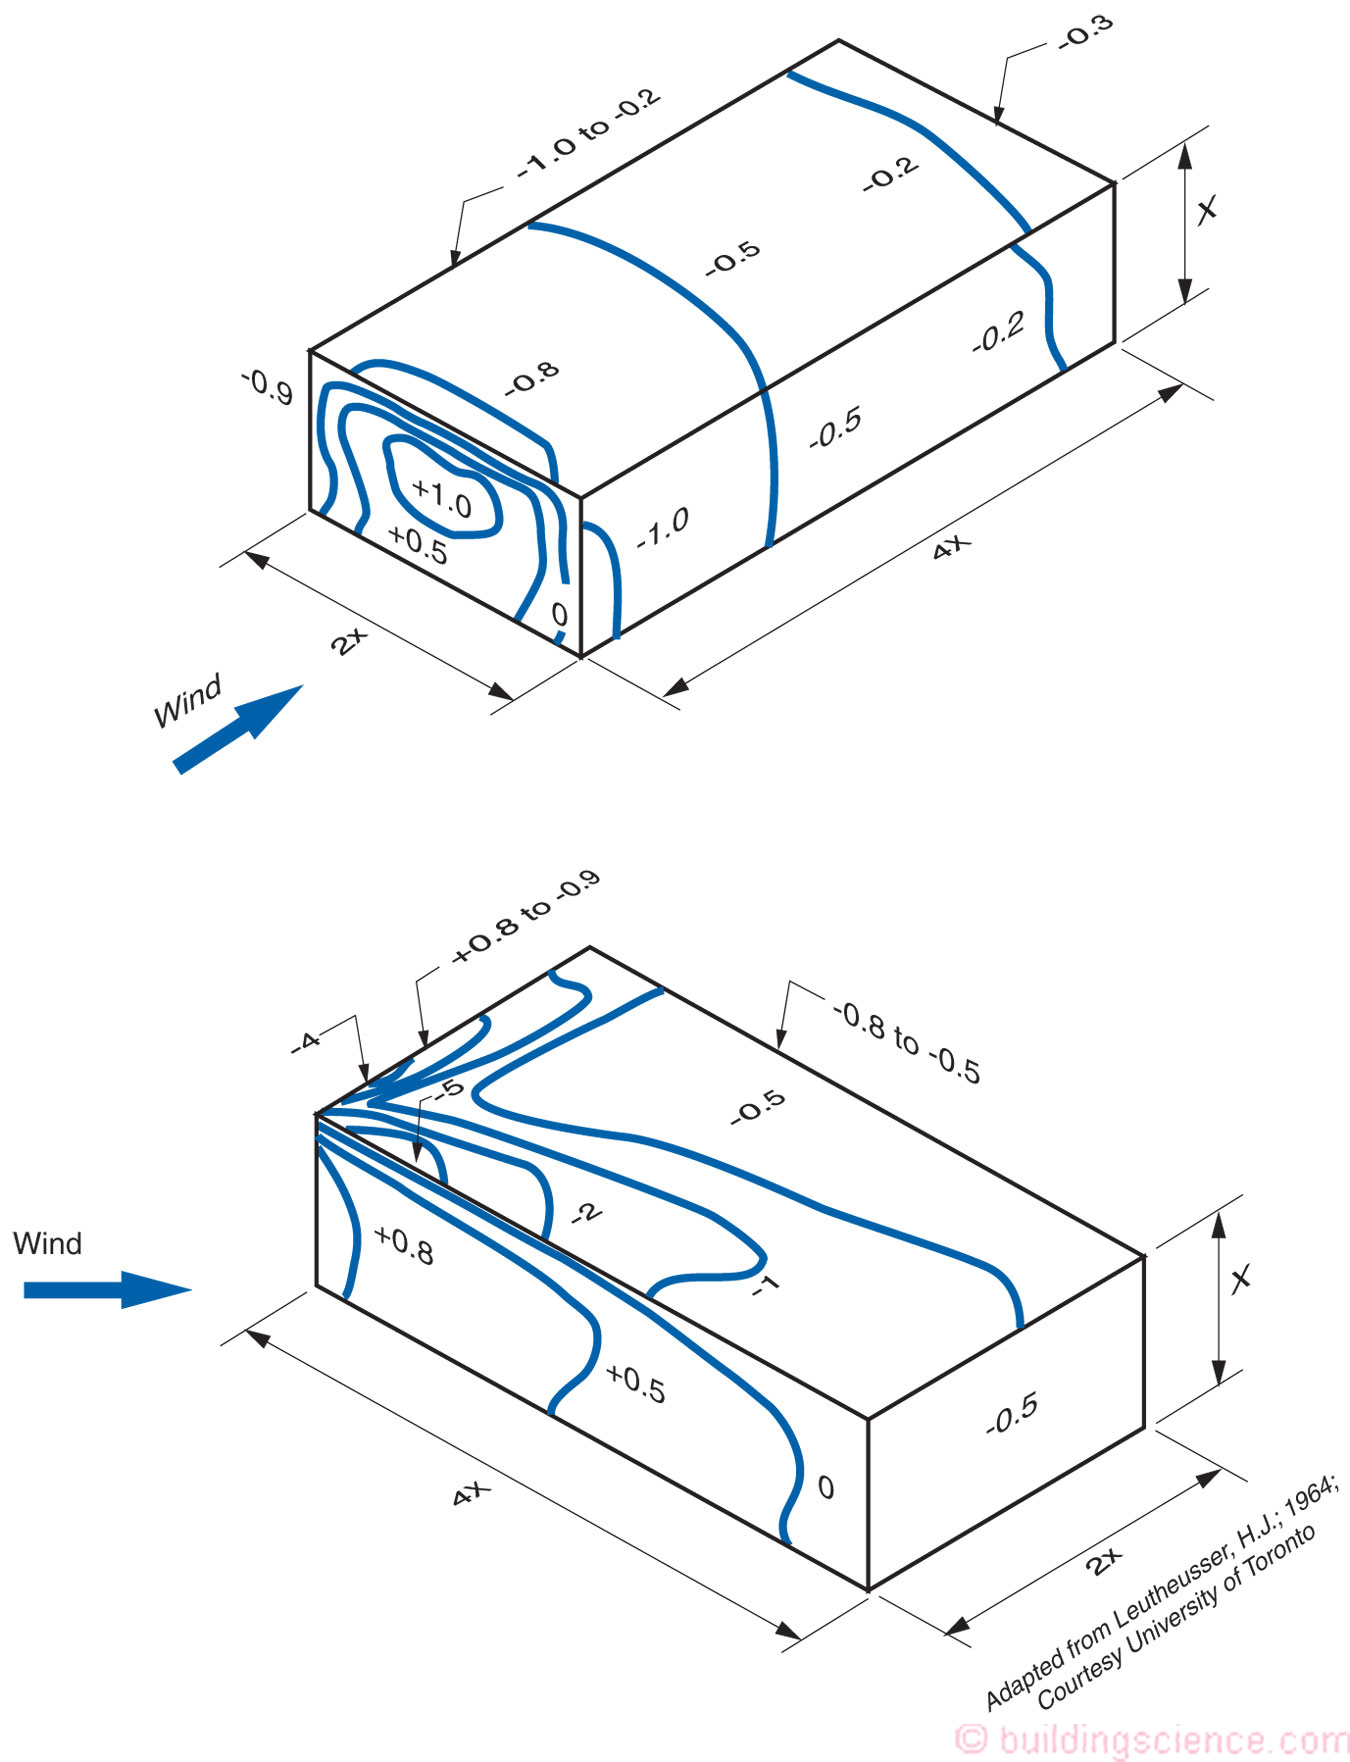
Figure 4: Wind Pressure Coefficients - These pressures become more pronounced with sloping roofs typical to residential construction
These pressures become more pronounced with sloping roofs typical to residential construction (Figure 5 and Figure 6). Interior spaces can simultaneously experience high positive pressures especially if a window or door is “blown in” or fails. In a multi-layer roof assembly where elements (or layers) are not sealed and mechanically attached roof membranes are used the membrane can “flutter” and ultimately fail (Figure 7, Photograph 1 and Photograph 2). We were here before (“How Not to Build Roofs”, ASHRAE Journal, March 2008).
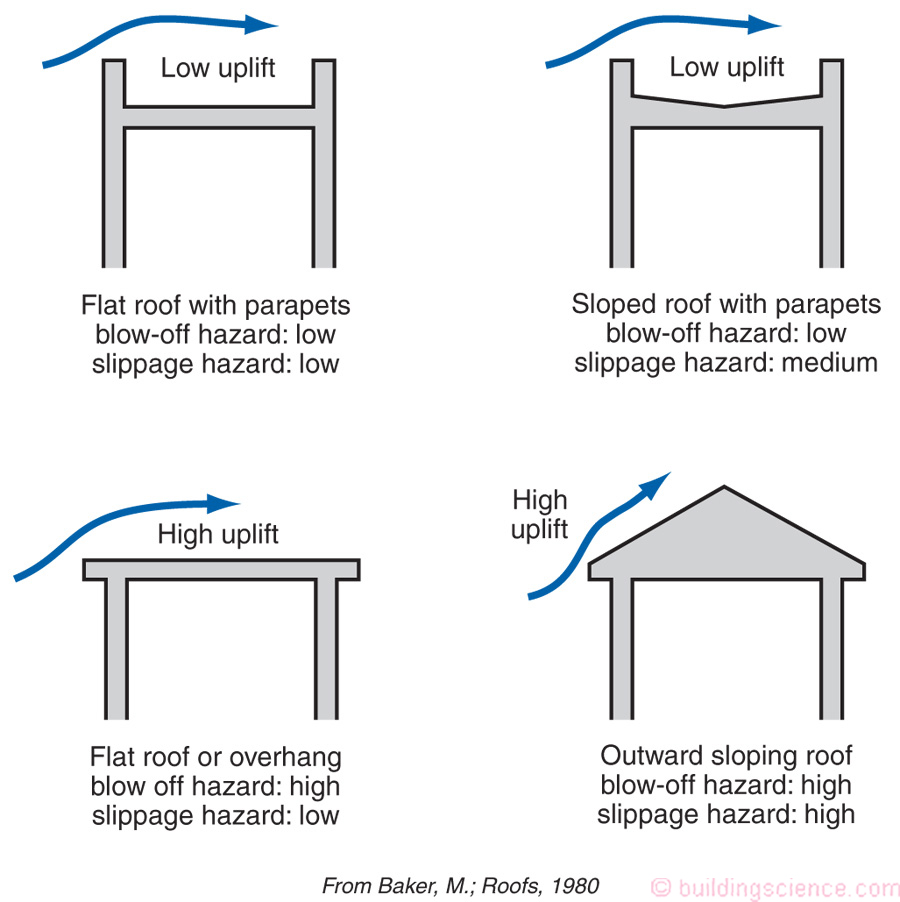
Figure 5: Roof Uplift – Uplift forces become more pronounced in sloped roof assemblies
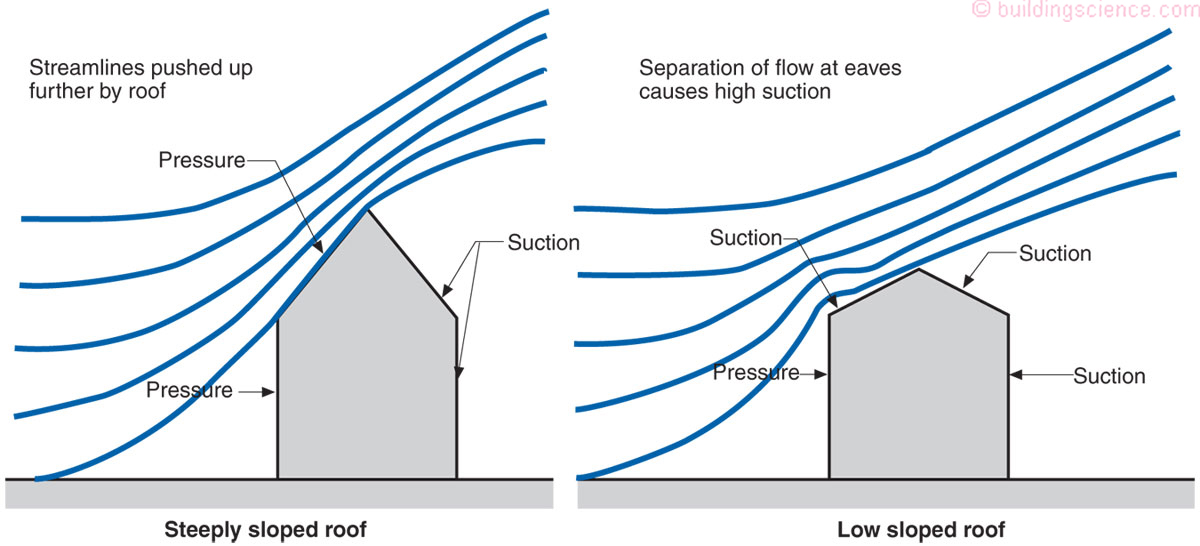
Figure 6: Sloping Roof Streamlines – Pressures become more pronounced as roof slope increases.
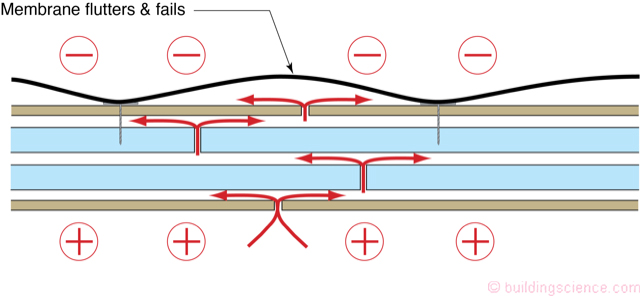
Figure 7: Membrane Flutter - In a multi-layer roof assembly where elements (or layers) are not sealed and mechanically attached roof membranes are used the membrane can “flutter” and ultimately fail.
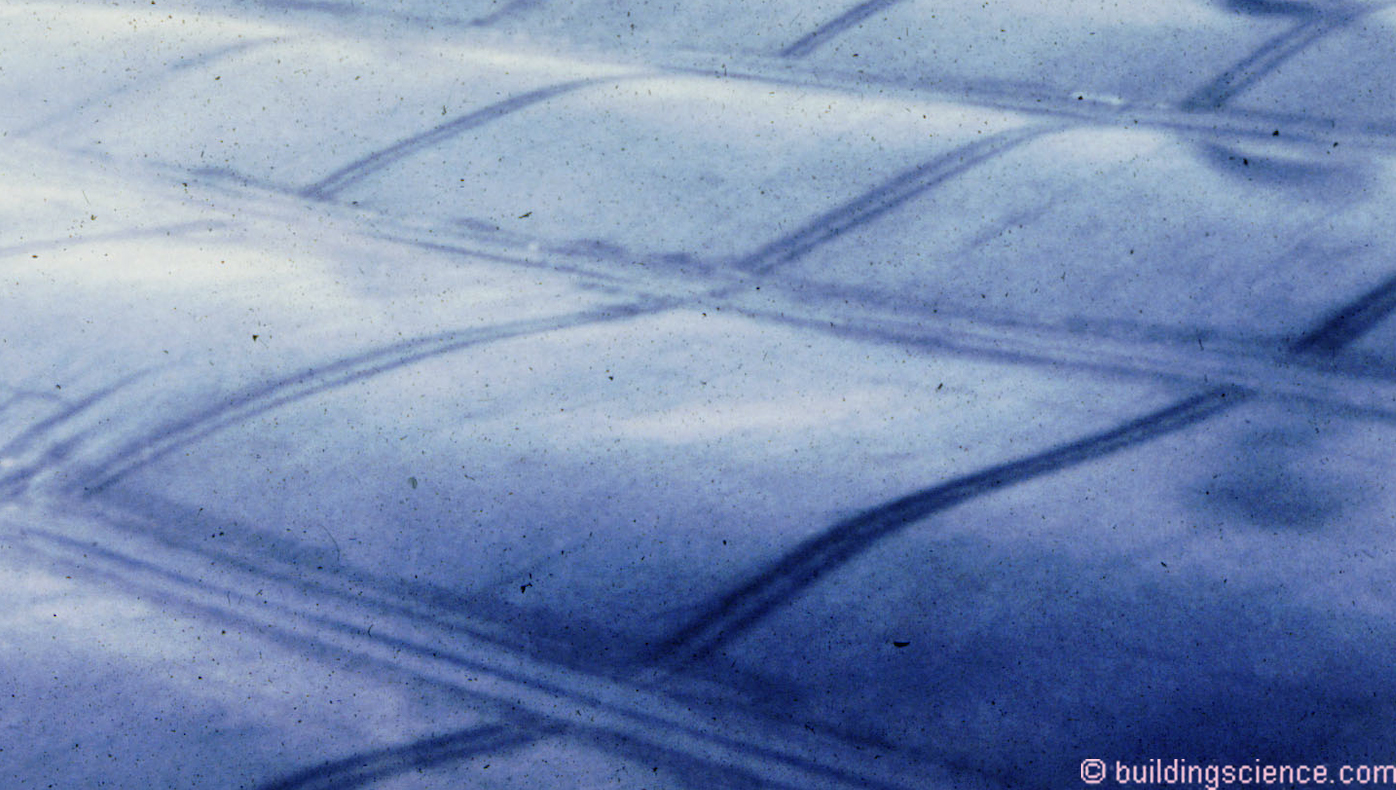
Photograph 1: Membrane Flutter – Roof as a water bed.
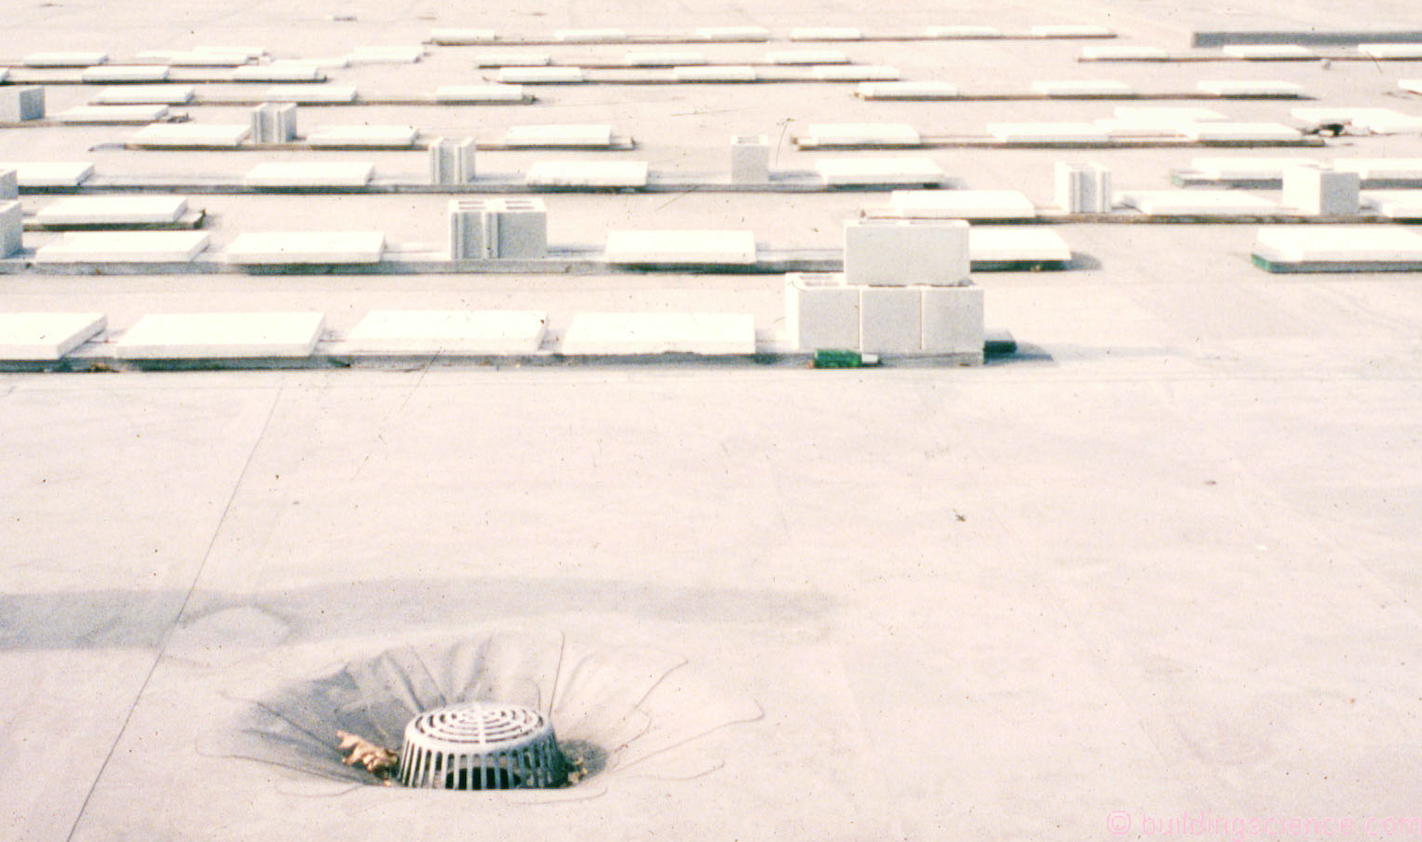
Photograph 2: Membrane Flutter Repair – Yes, this is done more often than we would all like to admit.
Fluttering, besides stressing the membrane, leads to the pumping transfer of airborne moisture from the interior into the roof assembly in cold and mixed climates. Historically, this has typically been a cold climate phenomenon but the problems are migrating south as membranes become white rather than black. Dark membranes get very hot – and the heat drives the moisture back down into the building. In the south mechanically attached dark membranes roofs avoided moisture issues because the moisture that was pumped up was driven back down by the huge temperature gradient. However, with energy conservation and light colored membranes and higher levels of insulation many roofs no longer get hot enough to drive flutter driven moisture back down into the building. Failures that were limited to cold climates now happen in mixed climates.
Air control layers (“air barriers”) control fluttering since any attempt by the membrane to lift off the insulation layers is resisted by suction - air from the interior is not able to enter the roof assembly due to the presence of the lower control layer (“air barrier”). The lack of an air control layer and a leaky deck will allow replacement air to enter the roof assembly from the interior and the suction resistance is lost.
In high wind zones fully adhered membranes are recommended for low slope roofs. Additionally, a fully adhered air control layer (“air barrier”) should be installed at the lower deck sheathing and joints in rigid insulation be sealed or taped (Figure 8). This approach reduces the air pressure difference across the upper membrane and thereby reduces the risk of failure to “blow off” and “fluttering”. Note that this is also recommended in all roof assemblies – not just those in high wind zones – to control air transported moisture from the interior.
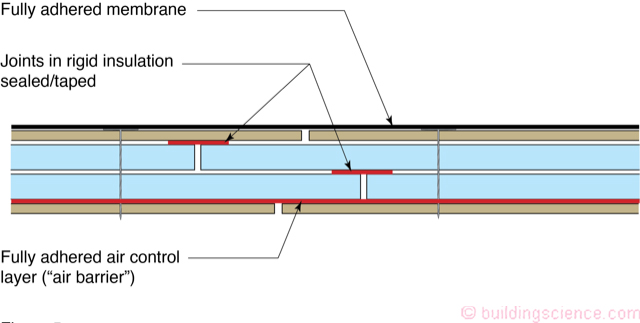
Figure 8: Wind Air Pressure Control - In high wind zones fully adhered membranes are recommended for low slope roofs. Additionally, a fully adhered air control layer (“air barrier”) should be installed at the lower deck sheathing and joints in rigid insulation be sealed or taped.
In high wind zones fully adhered roof membrane underlayments are recommended for sloped roofs. Additionally, a fully adhered air control layer (“air barrier”) should be installed over the lower structural roof deck sheathing (Figure 9). This approach reduces the air pressure difference across the roof coverings and thereby reduces the risk of failure to “blow off”. Additionally, the fully adhered roof membrane underlayment provides a “second line of defense” should the roof coverings blow off. Finally, the lower fully adhered air control layer (“air barrier”) provides a “third line of defense” should the upper deck sheathing and the rigid insulation be lost. It is also recommended that the joints in the rigid insulation layers be taped or sealed.
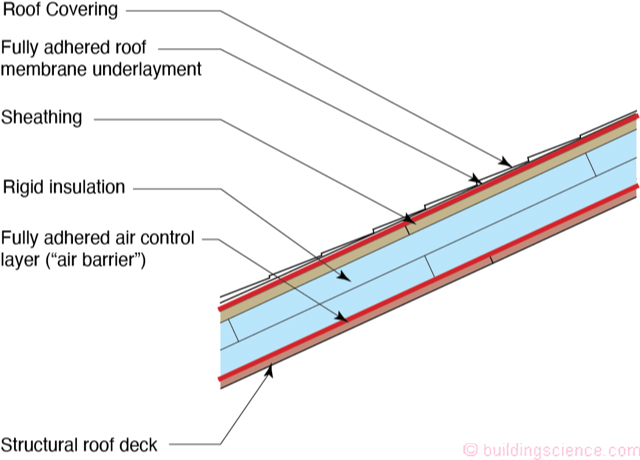
Figure 9: Wind Air Pressure Control - In high wind zones fully adhered roof membrane underlayments are recommended for sloped roofs. Additionally, a fully adhered air control layer (“air barrier”) should be installed over the lower structural roof deck sheathing.
The fully adhered air control layer (“air barrier”) at the lower deck sheathing in both low slope roofs and sloped roofs can be omitted if the lower roof deck sheathing joints are sealed with tape or membrane strips that are compatible with the plywood or OSB sheathing.[2] An alternative approach – applicable in retrofit applications is to seal the sheathing joints from underneath using closed cell, high density spray polyurethane foam (SPF) (Photograph 3).[3]
The greatest stress roof assemblies experience in high wind zones are at roof edges. As noted earlier, the pressures are more pronounced in sloping roofs. In sloping roofs you win or lose the game at roof eaves and roof rakes. That is where roofs experience the highest positive and negative air pressures. The structural connections connecting the roof deck layers to the wall assemblies need to be “robust” (Photograph 4 and Photograph 5). We were also here before (BSI-056: Leiningen Versus The Ants Redux, May 2012).
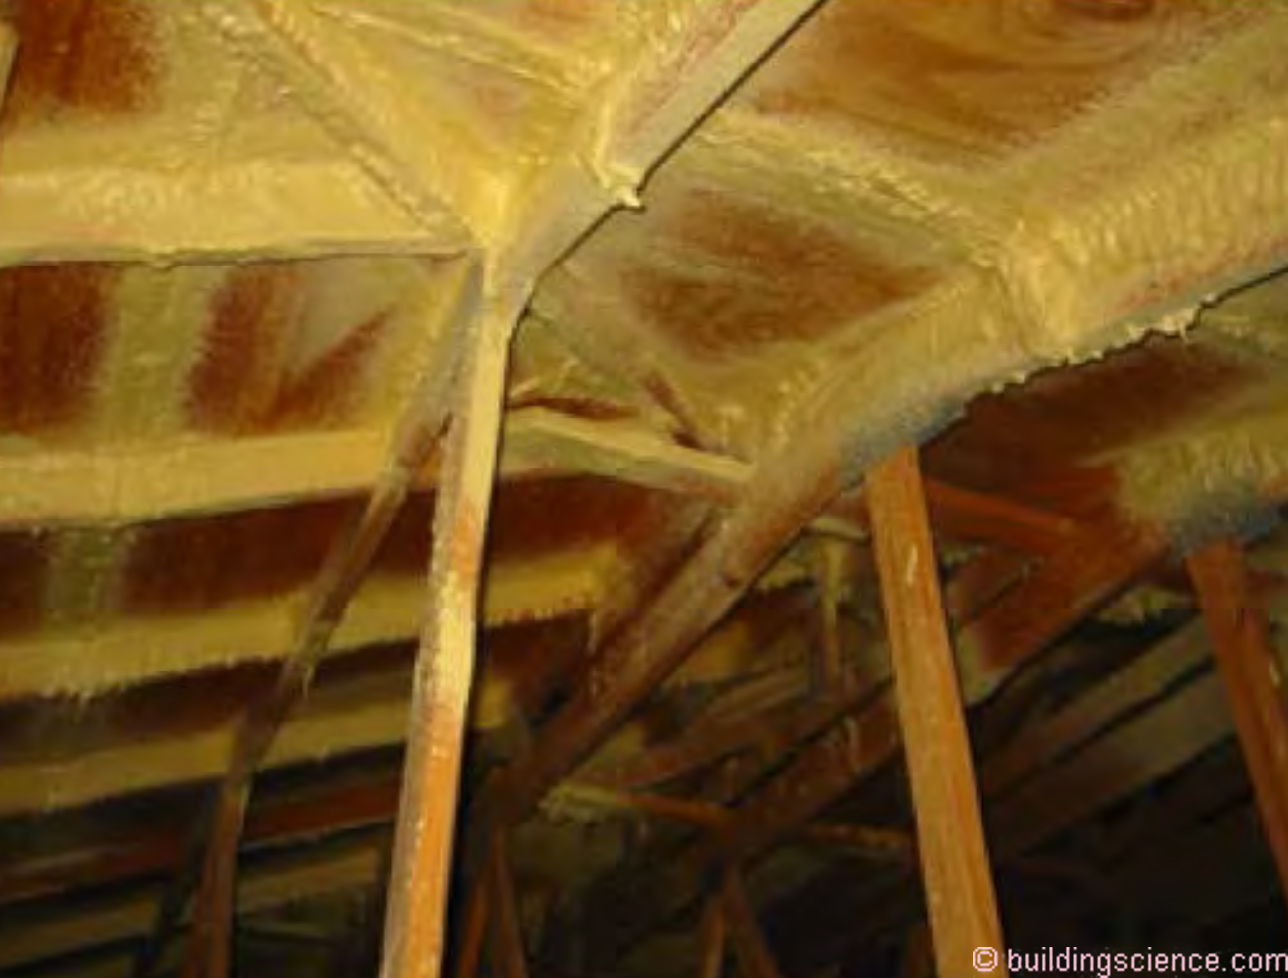
Photograph 3: Retrofit Repair – In retrofit applications it may be possible to seal the sheathing joints from underneath using closed cell, high density spray polyurethane foam (SPF). Photograph courtesy of The Insurance Institute for Business & Home Safety (IBHS).
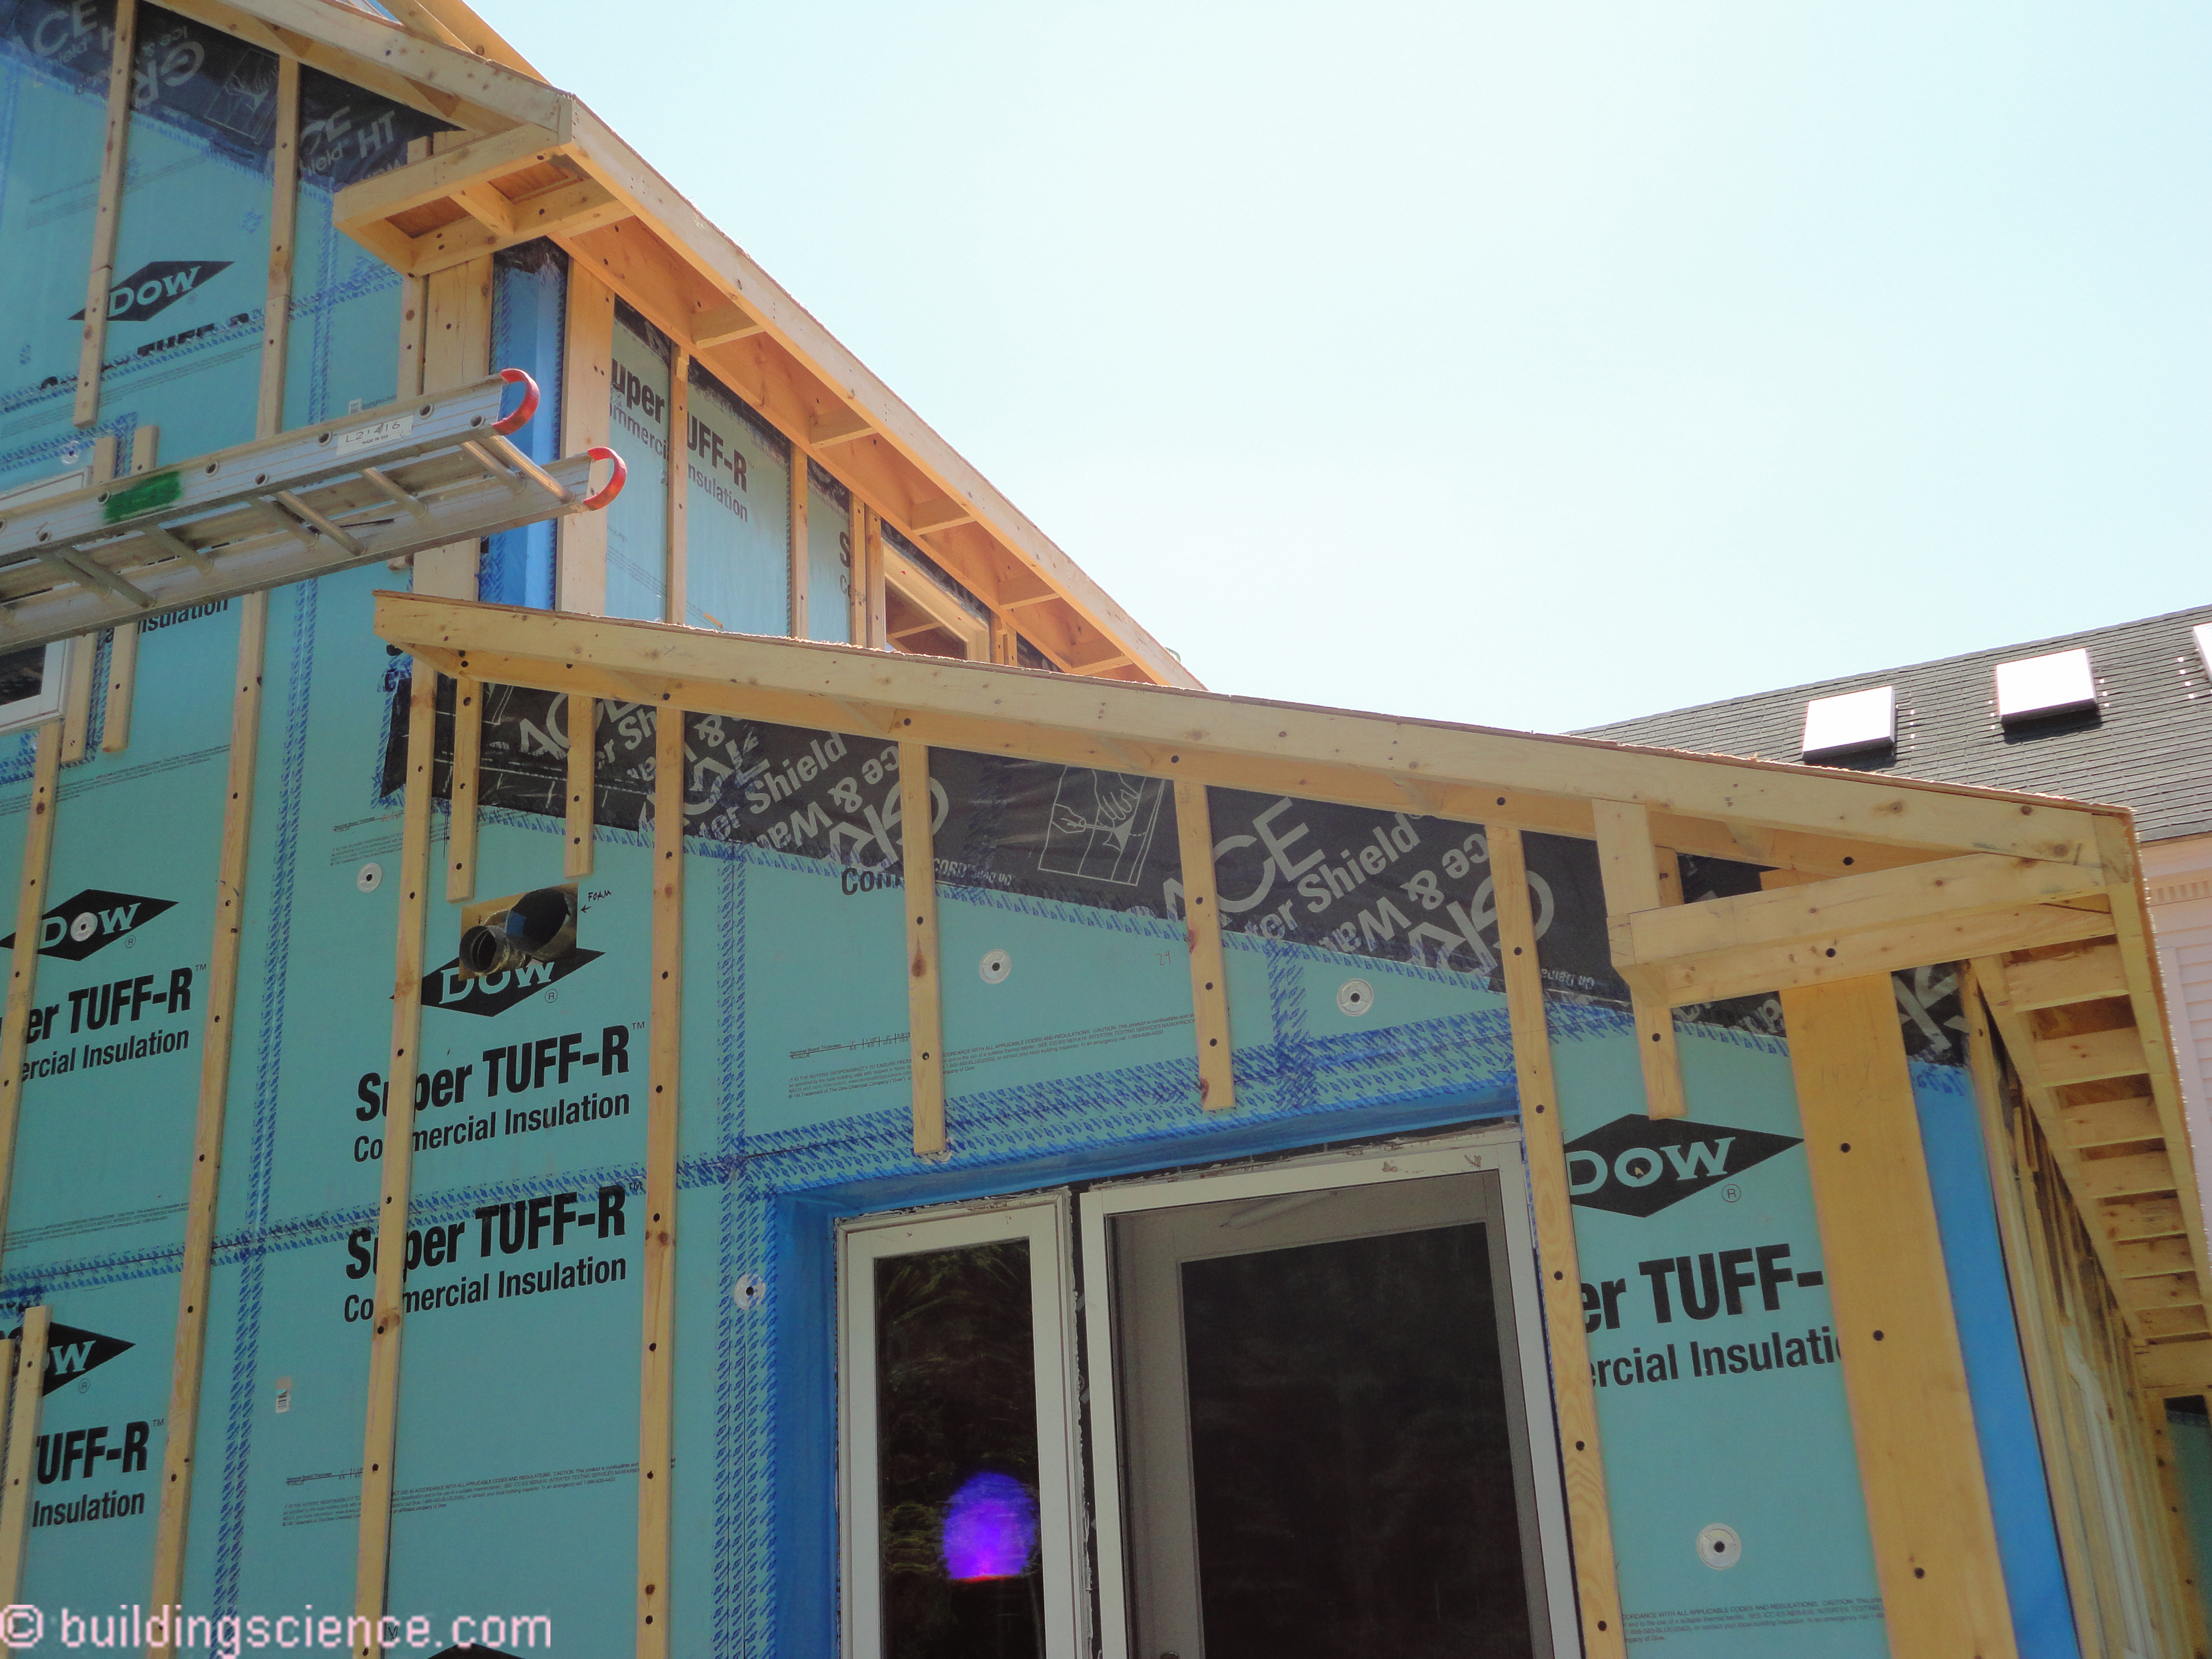
Photograph 4: Robust Connections - Roof eaves and roof rakes experience the highest positive and negative air pressures. The structural connections connecting the roof deck layers to the wall assemblies need to be “robust”.
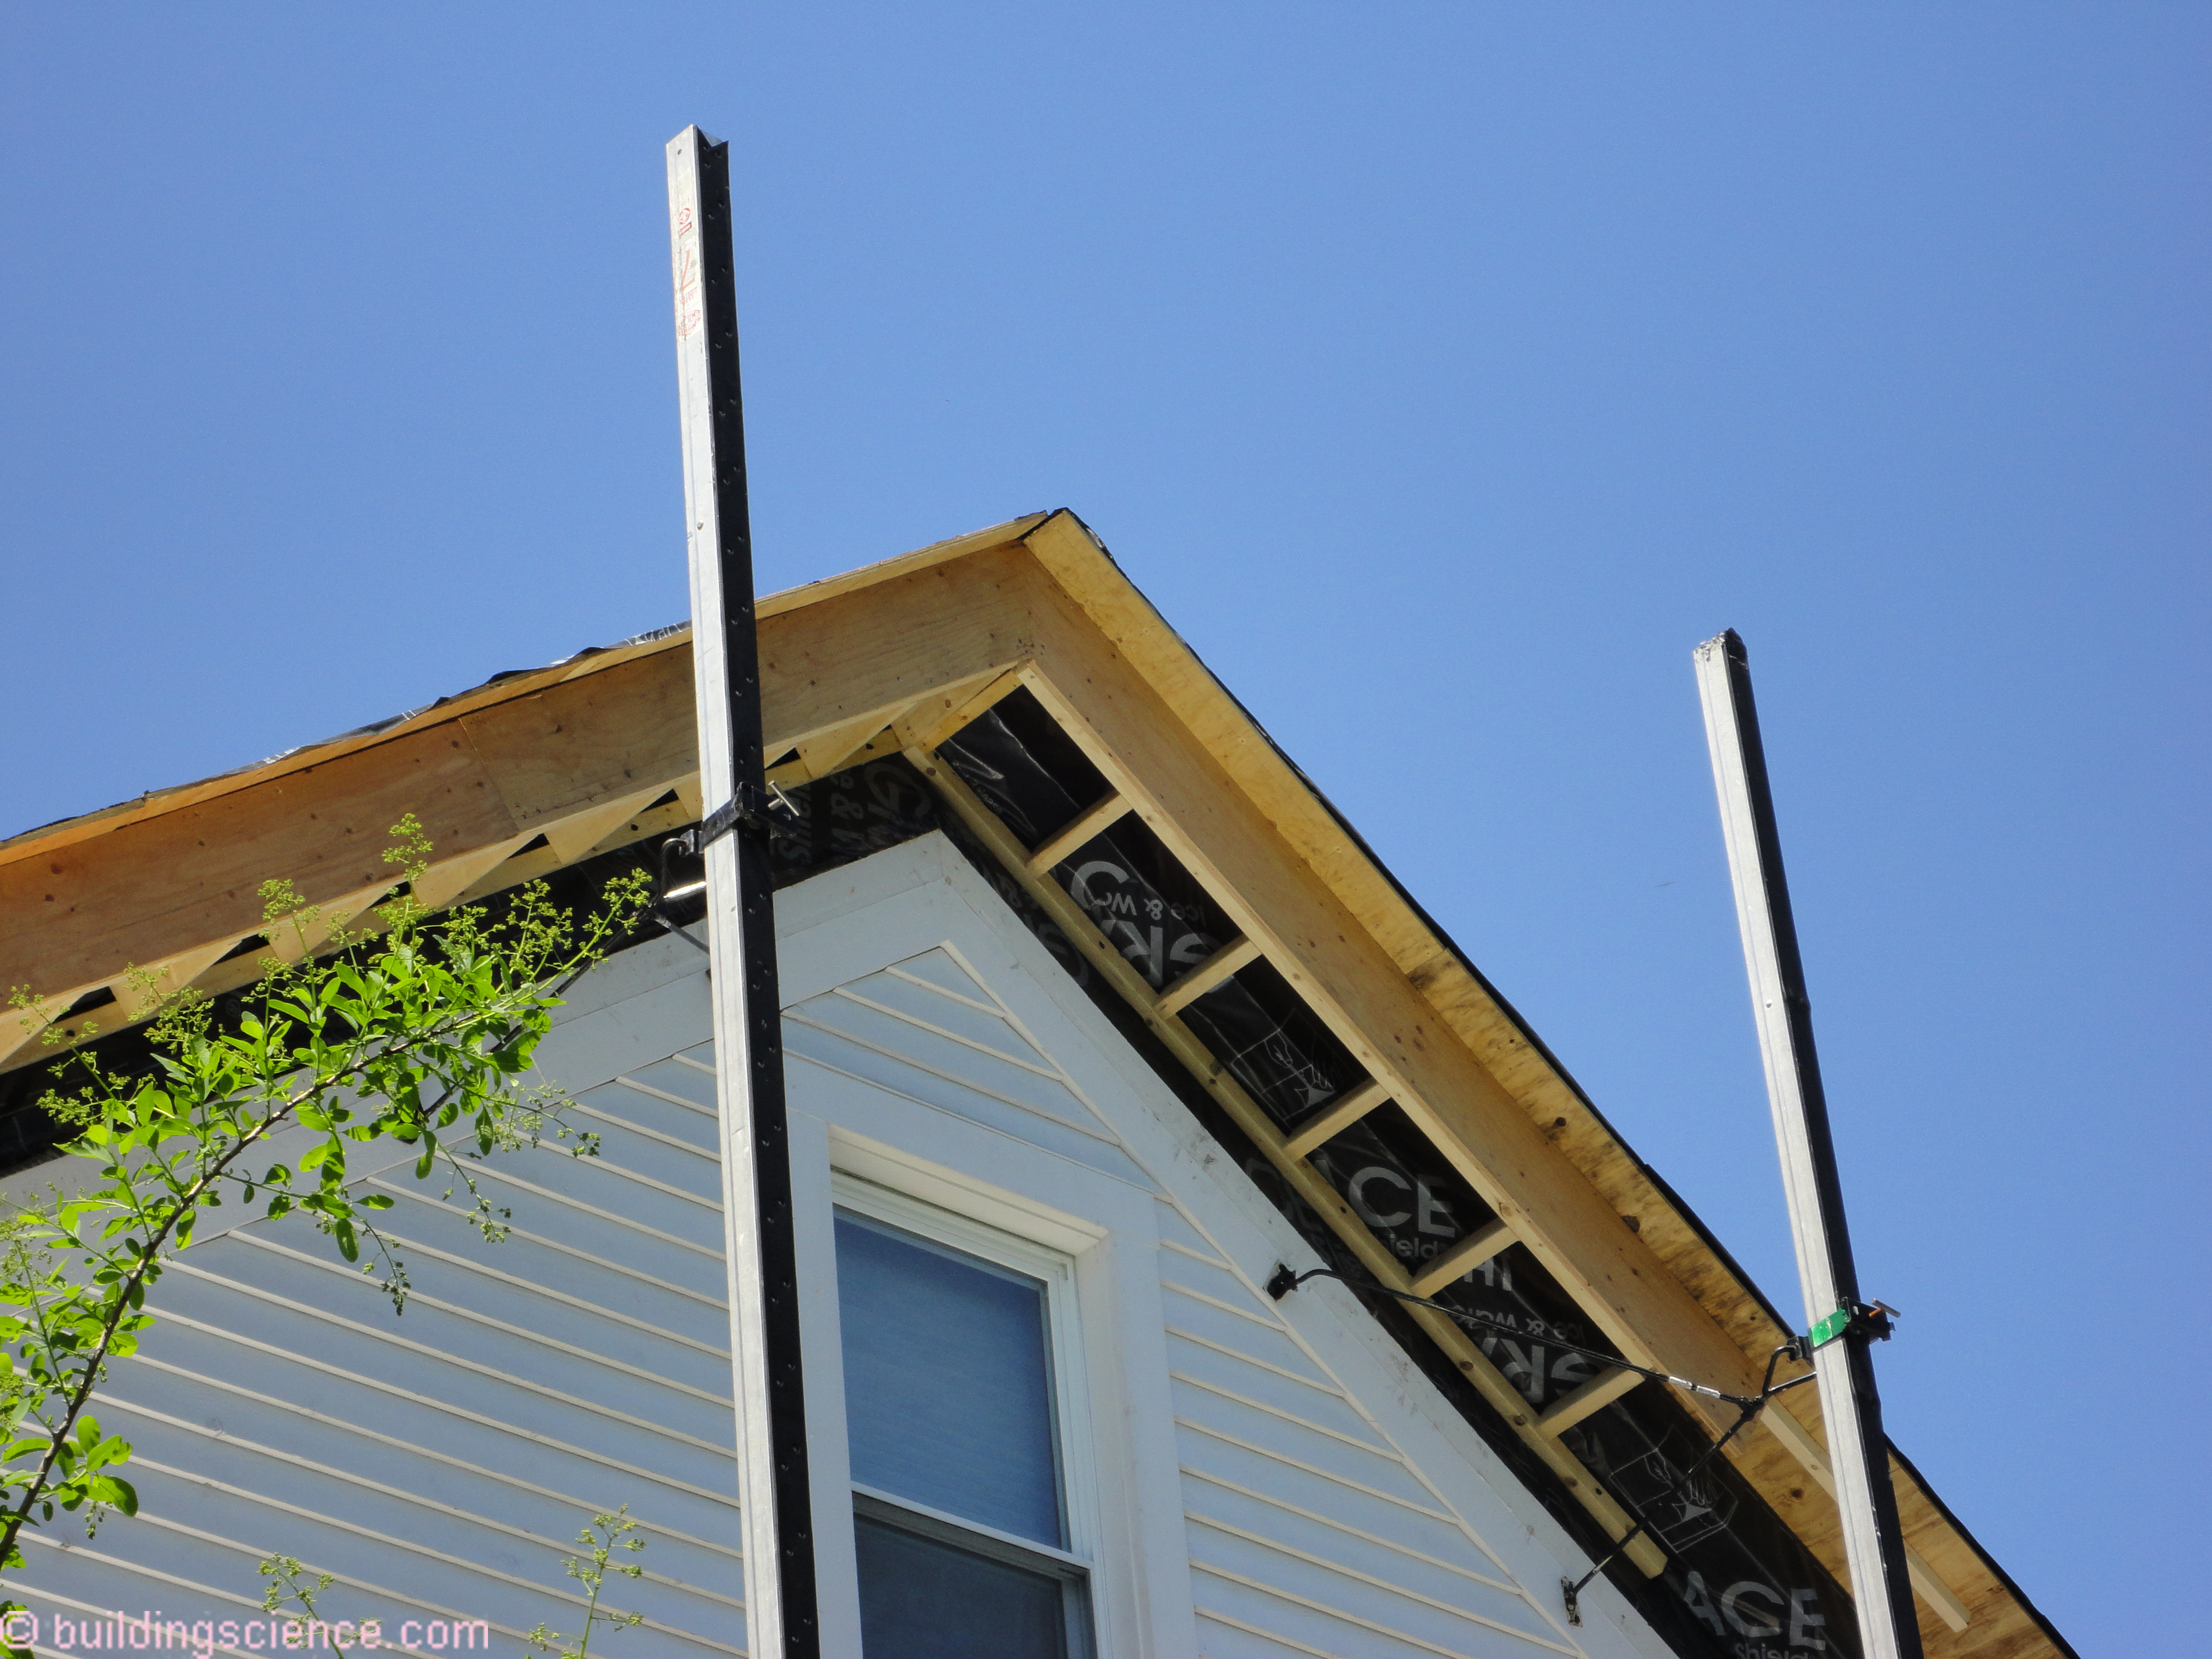
Photograph 5: More Robust Connections - Roof eaves and roof rakes experience the highest positive and negative air pressures. The structural connections connecting the roof deck layers to the wall assemblies need to be “robust”.
In high wind zones it is recommended that metal drip edges be installed at roof eaves and roof rakes (Figure 10). The following metal drip edge installation requirements are recommended:
- Drip edges should overlap a minimum of 3 inches at joints
- Eave drip edges should extend a minimum of ½ inch below sheathing and overlap the top of the roof sheathing edge a minimum of 2 inches
- The drip edge should be mechanically fastened to the roof deck at a maximum spacing of 4 inches and the fasteners should be compatible with the flashing
- Drip edges at gables/rakes should be installed over the fully adhered membrane underlayment
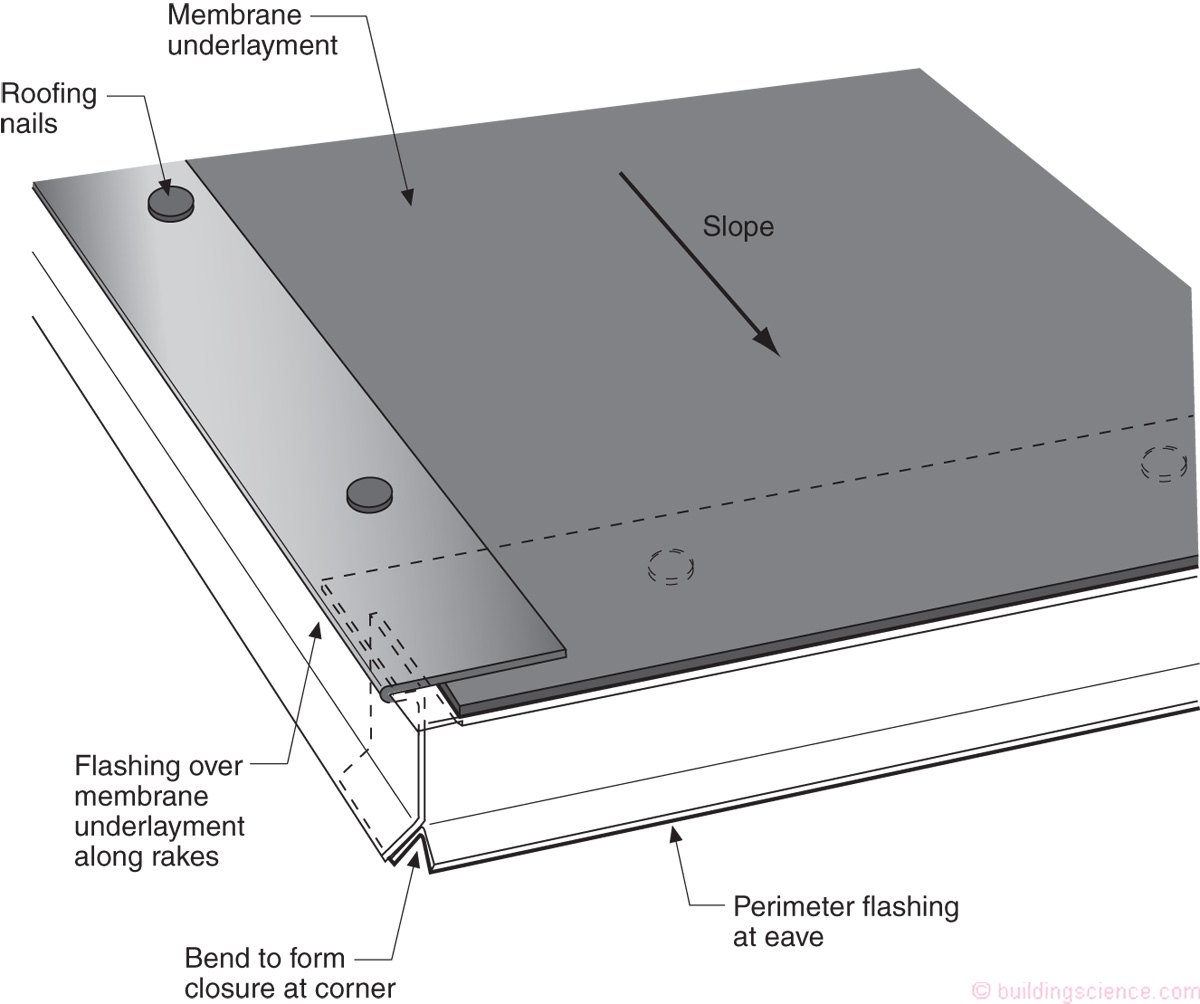
Figure 10: Metal Drip Edges - In high wind zones it is recommended that metal drip edges be installed at roof eaves and roof rakes.
Asphalt shingles that are installed at eaves should be installed over an asphalt shingle starter strip that is adhered to the fully adhered membrane underlayment or to the drip edge or both (Figure 11).
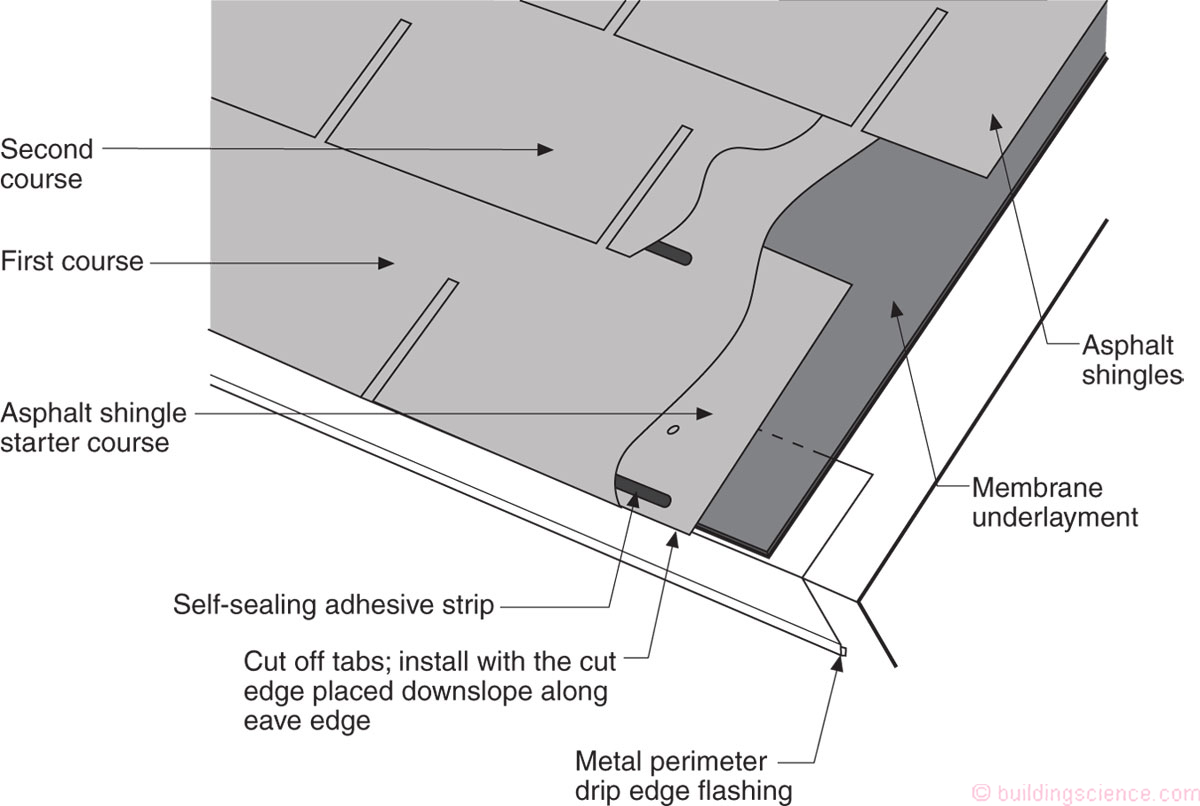
Figure 11: Asphalt Shingles - Asphalt shingles that are installed at eaves should be installed over an asphalt shingle starter strip that is adhered to the fully adhered membrane underlayment or to the drip edge or both.
Asphalt shingles that are installed at gables/rakes should be installed set in a minimum 8 inch wide strip of flashing cement.
Do all of this and you are in pretty good shape. Now for the controversial part. Thought I would leave it to the end. Unvented roofs resist wind and rain and wildfire and pests better than vented roofs. We will have a run at this some other time.
[1] Duh. If the roof leaks it has a hole in it. Can’t have holes in the roof membrane or it leaks. We have gotten good at getting rid of the holes in this layer. The other layers? Not so much…
[2] The Insurance Institute for Business & Home Safety (IBHS) have done phenomenal work on improving the wind resistance of buildings. I have shamelessly “borrowed” their stuff over the years. The following link is well worth the visit:
[3] The SPF approach comes from David Prevatt…a structural engineer at a small school in Gainesville, FL that has a football team named after a crocodilian called A.mississippiensis…sometimes referred to as a ”Gator”. Dr. Prevatt is quietly changing the way we build in high wind zones. He is a Bob Dylan fan…”Blowing in the Wind”…
